In previous posts , i have given a example for simple registration form in asp.net , registration form in Asp.Net using 3-tier architecture. And now i am doing the same example(no changes in design) with ADO.NET Entity Data Model, and we will see how we can add Model in normal Asp.Net website (here i am not taking Asp.Net MVC project).
Using Ado.Net entity model we can reduce our coding as it becomes more easy to perform CRUD(create,update,delete) operations.
Here we will see how to add the model to our Asp.Net project and how we code for performing Create operation.
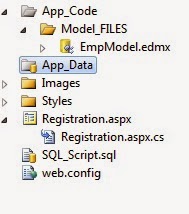
The project architecture is shown below.
Query to create table :


After adding model to your website, the connection string for the entity model is defined in the web.config file. No need of manually entering the connection string.
Thanks for reading, please share your views in comment.
Download Source Code
Using Ado.Net entity model we can reduce our coding as it becomes more easy to perform CRUD(create,update,delete) operations.
Here we will see how to add the model to our Asp.Net project and how we code for performing Create operation.
The project architecture is shown below.
If you observe the architecture, i have added a folder Model_Files in App_Code folder and added a model EmpModel.edmx in the folder.
Before adding model, first i have designed registration form and created table in a database.
In this example, my database name is MYDB, and table name is RegisterEmp
Query to create table :
CREATE TABLE [dbo].[RegisterEmp]( [UserName] [varchar](50) NOT NULL, [Email] [nvarchar](50) NOT NULL primary key, [Password] [nvarchar](50) NULL, [Gender] [varchar](50) NULL, [DOB] [varchar](50) NULL, [Mobile] [varchar](50) NULL, [Physical] [varchar](50) NULL, [Country] [varchar](50) NULL, [City] [varchar](50) NULL, [Address] [varchar](500) NULL, [FileName] [varchar](500) NULL,[FileData] [varbinary](max) NULL) ON [PRIMARY]
Below are the Steps to add Ado.Net Entity Data Model to our Asp.Net Application :
Step1 :
Right click on Model_Files folder, select Add New Item -> Select ADO.NET Entity Data Model -> rename it as EmpModel.edmx -> click Add
Step2: click on Next
Step 3:
Step 4:
click on New connection , enter Server name, sql server authentication details, and click on Test Connection. click OK
Step 5:
After testing connection, check the radio button Yes, include the sensible data in the connection string.,
check Save entity connection settings in Web.Config as, and you can change the connection string name, which will be defined in web.config when you create model.
Click on Next.
Step 6:
In step6, uncheck the Pluralize or singularize generated object names, select the table RegisterEmp, click on Finish.
you can see the added model, as shown in the figure below.
I have designed the registration form as shown in the figure below, and also the source code is available for download.
Now the code in the code behind file is like this.
using System;
using System.Collections.Generic;
using System.Linq;
using System.Web;
using System.Web.UI;
using System.Web.UI.WebControls;
using System.IO;
using Model_FILES; //including Model NameSpace
public partial
class Registration
: System.Web.UI.Page
{
protected void
Page_Load(object sender, EventArgs e)
{
}
protected void
btnSubmit_Click(object sender, EventArgs e)
{
MYDBEntities Entity_Obj = new
MYDBEntities();
//Employee emp = new Employee();
//Employee emp = new Employee();
RegisterEmp emp_Model_Obj = new RegisterEmp();
string[] validFileTypes = { "doc",
"docx" };
string ext = System.IO.Path.GetExtension(FileUploadResume.PostedFile.FileName);
bool isValidFile = false;
try
{
for (int i = 0; i < validFileTypes.Length; i++)
{
if (ext == "."
+ validFileTypes[i])
{
isValidFile = true;
break;
}
}
if (!isValidFile) //checking
whether the file is valid or not
{
lblMessage.ForeColor = System.Drawing.Color.Red;
lblMessage.Text = "Invalid File. Only
" +
string.Join(",",
validFileTypes) + " files are allowed..";
return;
}
emp_Model_Obj.UserName = txtName.Text;
emp_Model_Obj.Email = txtEmail.Text.ToLower();
emp_Model_Obj.Password = txtPassword.Text;
emp_Model_Obj.Gender = rbtnListGender.SelectedItem.ToString();
emp_Model_Obj.DOB = txtDOB.Text.ToString();
emp_Model_Obj.Mobile = txtMobile.Text;
emp_Model_Obj.Country = txtCountry.Text;
emp_Model_Obj.City
= txtCity.Text;
emp_Model_Obj.Address = txtAddress.Text;
if (chkPhysical.Checked == true)
{
emp_Model_Obj.Physical = "yes";
}
else
{
emp_Model_Obj.Physical = "NO";
}
if (FileUploadResume.HasFile)
{
Stream fs =
FileUploadResume.PostedFile.InputStream;
emp_Model_Obj.FileName = FileUploadResume.FileName.ToString();
BinaryReader br = new
BinaryReader(fs);
emp_Model_Obj.FileData = br.ReadBytes((Int32)fs.Length);
br.Close();
fs.Close();
}
//Adding Employee
//here AddToRegisterEmp() method is added automatically
by adding Model
Entity_Obj.AddToRegisterEmp(emp_Model_Obj);
//saving changes to database
Entity_Obj.SaveChanges();
lblMessage.ForeColor = System.Drawing.Color.Green;
lblMessage.Text = "Employee Added
successfully";
}
catch (Exception
ex)
{
lblMessage.ForeColor = System.Drawing.Color.Red;
lblMessage.Text = ex.Message;
return;
}
}
protected void
btnClear_Click(object sender, EventArgs e)
{
//refreshing/reloading page to clear all the controls
Response.Redirect(Request.Url.ToString());
}
}
After adding model to your website, the connection string for the entity model is defined in the web.config file. No need of manually entering the connection string.
Thanks for reading, please share your views in comment.
Download Source Code
No comments:
Post a Comment
Thanks for your comments.
-Sameer