In previous posts , i have given a example for simple registration form in asp.net . And now i am extending the same example to 3-tier. As almost everyone knows what is 3-tier architecture, so here i am not going to write much about 3-tier architecture. If you are not aware of 3-tier architecture, you can search on google.
In this article, we are not only doing 3-tier architecture example but we also see how the same coding can be used for both Asp.Net and Windows application.
In 3-tier Architecture, we divide our project coding in 3 layers,
1) Presentation Layer
2) Business Logic Layer / Business Access layer
3) Data Access layer
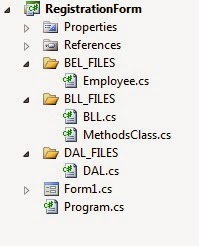
So i have taken my asp.net project architecture as shown in figure below .
In App_Code folder, i have added 3 folders that you can see in image above, they are BEL_FILES, BLL_FILES, DAL_FILES.
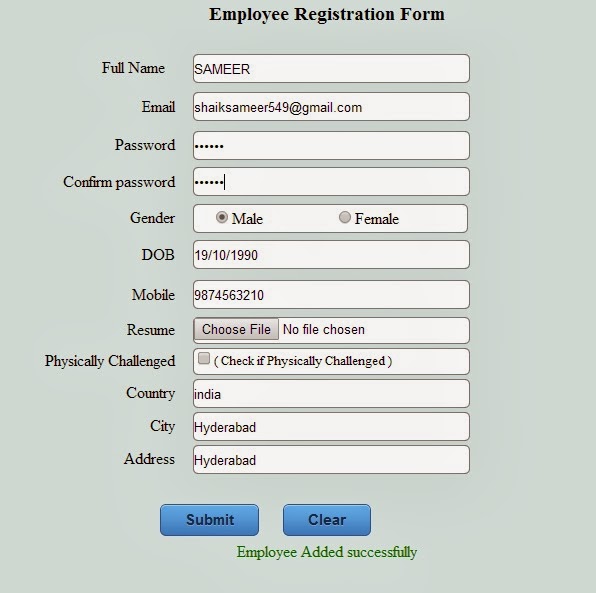
Below is the screen shot of registration form designed
The Asp.Net controls used in screen designing are:
Label control
Textbox control
Checkbox control
Radio button list control
Fileupload control
Button control
Required Field validator (for all required fields)
Regular expression validator (for validating email,mobile)
compare validator (to compare password with confirm password field)
The Database table structure is like this
Query to create table :
BEL_FILES contains classes defined for entities, as here we are doing employee registration form , of-course there should be a class Employee.
Employee Class will have all the required properties and methods related to employee.
The Employee Class Code is like this :
The BLL_FILES folder (which is considered as Business Logic layer) contains all the class files required for implementing logic.
Here I have BLL class and the logic code required for registering an employee is all done here.
DAL_FILES contains all the required classes of Data Access Layer.
It Contains the methods to do all the required query operations with database.
Here the DAL class is present in DAL_FILES, and its code is given below.
And finally the Submit button_Click code for the registration form is in Asp.Net is like this :
The one of the major advantages of 3-tier / n-tier architecture is code re-usability.
You can use the same code in windows forms Application, just the validation part and some of the button click code may change, and the remaining code will remain same.
I have used the same code with Registration form in Windows Forms Application, the screenshot is given below.
the windows forms controls used to design screen are :
Labels
Textboxes
Radio buttons
Date Time Picker
Checkbox
DropdownList
Groupbox
Listbox
Buttons
Error Provider
Timer Control
The project architecture of my windows forms application is shown in figure below
Here the Submit button click code in windows forms Application is like this :
I have designed these projects especially for beginners, and tried my best to cover all the needed controls, logic and validation part and made it more clear and useful.
I hope beginners will find this useful. For beginners, i will recommend to download the full Source code of the projects both (asp.net and winforms Application) from the links provided below.
Note: Here after downloading the source code, for windows application you need to create table in your sql server database and should change the connection string in DAL Class. The sql query to create table is also provided with the source code.
Download Asp.Net 3-tier Registration Form
Download C#.NET 3-tier Registration Form
posts you may like :
In this article, we are not only doing 3-tier architecture example but we also see how the same coding can be used for both Asp.Net and Windows application.
In 3-tier Architecture, we divide our project coding in 3 layers,
1) Presentation Layer
2) Business Logic Layer / Business Access layer
3) Data Access layer
So i have taken my asp.net project architecture as shown in figure below .
In App_Code folder, i have added 3 folders that you can see in image above, they are BEL_FILES, BLL_FILES, DAL_FILES.
Below is the screen shot of registration form designed
The Asp.Net controls used in screen designing are:
Label control
Textbox control
Checkbox control
Radio button list control
Fileupload control
Button control
Required Field validator (for all required fields)
Regular expression validator (for validating email,mobile)
compare validator (to compare password with confirm password field)
The Database table structure is like this
Query to create table :
CREATE TABLE [dbo].[RegisterEmp]( [UserName] [varchar](50) NOT NULL, [Email] [nvarchar](50) NOT NULL primary key, [Password] [nvarchar](50) NULL, [Gender] [varchar](50) NULL, [DOB] [varchar](50) NULL, [Mobile] [varchar](50) NULL, [Physical] [varchar](50) NULL, [Country] [varchar](50) NULL, [City] [varchar](50) NULL, [Address] [varchar](500) NULL, [FileName] [varchar](500) NULL,[FileData] [varbinary](max) NULL
) ON [PRIMARY]
BEL_FILES contains classes defined for entities, as here we are doing employee registration form , of-course there should be a class Employee.
Employee Class will have all the required properties and methods related to employee.
using System;
using System.Collections.Generic;
using System.Linq;
using System.Text;
public class
Employee
{
//All the
properties of a employee
public string UserName { set;
get; }
public string Password { set;
get; }
public string Email { set; get; }
public string Gender { get; set; }
public string DOB { get; set; }
public string Mobile { get; set; }
public string physicallyChallenged { get; set; }
public string Country { get;
set; }
public string City { get; set; }
public string Address { get;
set; }
public string AttachedFileName { get;
set; }
public byte[] AttachedFileData { get;
set; }
/// <summary>
/// Method to Add Employee
/// </summary>
public void Add()
{
BLL
bll_obj = new BLL();
bll_obj.AddEmployee(this);
}
/// <summary>
/// method to delete employee
/// </summary>
public void Delete()
{
//Implement
code logic here to delete employee
}
/// <summary>
/// method to update empoloyee details
/// </summary>
public void Update()
{
//Implement code logic here to update employee
}
}
The BLL_FILES folder (which is considered as Business Logic layer) contains all the class files required for implementing logic.
Here I have BLL class and the logic code required for registering an employee is all done here.
using System;
using System.Collections.Generic;
using System.Linq;
using System.Text;
//Namespaces of
ADO.NET
using System.Data;
using System.Data.SqlClient;
public class
BLL
{
SqlCommand
cmd;
DAL
dal_obj = null;
/// <summary>
/// Method to Add Employee
/// </summary>
/// <param
name="emp"></param>
public void AddEmployee(Employee
emp)
{
try
{
cmd = new
SqlCommand();
cmd.CommandType = CommandType.Text; //representing
type of command
cmd.CommandText = "INSERT INTO RegisterEmp
values(@UserName,@Email,@Password,@Gender,@DOB,@Mobile,@Physical,@Country,@City,@Address,@FileName,@FileData)";
//adding
parameters with value
cmd.Parameters.AddWithValue("@UserName", emp.UserName);
cmd.Parameters.AddWithValue("@Email", emp.Email);
cmd.Parameters.AddWithValue("@Password", emp.Password);
cmd.Parameters.AddWithValue("@Gender", emp.Gender);
cmd.Parameters.AddWithValue("@DOB", SqlDbType.Date).Value
= emp.DOB;
cmd.Parameters.AddWithValue("@Mobile", emp.Mobile);
cmd.Parameters.AddWithValue("@Physical", emp.physicallyChallenged);
cmd.Parameters.AddWithValue("@Country", emp.Country);
cmd.Parameters.AddWithValue("@City", emp.City);
cmd.Parameters.AddWithValue("@Address", emp.Address);
cmd.Parameters.AddWithValue("@FileName", emp.AttachedFileName);
cmd.Parameters.AddWithValue("@FileData", (SqlDbType.VarBinary)).Value
= emp.AttachedFileData;
dal_obj = new
DAL();
dal_obj.NonQuery(cmd);
}
catch (Exception ex)
{
throw
ex;
}
}
}
DAL_FILES contains all the required classes of Data Access Layer.
It Contains the methods to do all the required query operations with database.
Here the DAL class is present in DAL_FILES, and its code is given below.
using System;
using System.Collections.Generic;
using System.Linq;
using System.Text;
using System.Data;
using System.Data.SqlClient;
public class
DAL
{
SqlConnection
con;
private string GetConnectionString()
{
//getting connection string defined in web.config file
string
connectionStr = System.Configuration.ConfigurationManager.ConnectionStrings["MyConnection"].ToString();
return
connectionStr;
}
//method to execute Non-Query sql commands
//like insert,update,delete,stored procedures etc,.
public int NonQuery(SqlCommand
cmd)
{
try
{
int
RowsEffected = 0;
con = new SqlConnection(GetConnectionString());
cmd.Connection = con;
con.Open(); //opening connection
RowsEffected =
cmd.ExecuteNonQuery(); //executing query
con.Close(); //closing connection
return
RowsEffected;
}
catch (Exception ex)
{
throw
ex;
}
}
}
And finally the Submit button_Click code for the registration form is in Asp.Net is like this :
protected void
btnSubmit_Click(object sender, EventArgs e)
{
string[]
validFileTypes = { "doc", "docx" };
string
ext = System.IO.Path.GetExtension(FileUploadResume.PostedFile.FileName);
bool
isValidFile = false;
try
{
for
(int i = 0; i < validFileTypes.Length; i++)
{
if
(ext == "." + validFileTypes[i])
{
isValidFile = true;
break;
}
}
if
(!isValidFile) //checking whether the file is valid
or not
{
lblMessage.ForeColor =
System.Drawing.Color.Red;
lblMessage.Text = "Invalid File. Only " +
string.Join(",",
validFileTypes) + " files are allowed..";
return;
}
Employee
emp = new Employee();
emp.UserName = txtName.Text;
emp.Email =
txtEmail.Text.ToLower();
emp.Password = txtPassword.Text;
emp.Gender =
rbtnListGender.SelectedItem.ToString();
emp.DOB = txtDOB.Text.ToString();
emp.Mobile = txtMobile.Text;
emp.Country = txtCountry.Text;
emp.City = txtCity.Text;
emp.Address = txtAddress.Text;
if
(chkPhysical.Checked == true)
{
emp.physicallyChallenged = "yes";
}
else
{
emp.physicallyChallenged = "NO";
}
if
(FileUploadResume.HasFile)
{
Stream
fs = FileUploadResume.PostedFile.InputStream;
emp.AttachedFileName =
FileUploadResume.FileName.ToString();
BinaryReader
br = new BinaryReader(fs);
emp.AttachedFileData =
br.ReadBytes((Int32)fs.Length);
br.Close();
fs.Close();
}
//Adding
Employee
emp.Add();
lblMessage.ForeColor =
System.Drawing.Color.Green;
lblMessage.Text = "Employee Added successfully";
}
catch (Exception ex)
{
lblMessage.ForeColor = System.Drawing.Color.Red;
lblMessage.Text = ex.Message;
return;
}
}
The one of the major advantages of 3-tier / n-tier architecture is code re-usability.
You can use the same code in windows forms Application, just the validation part and some of the button click code may change, and the remaining code will remain same.
I have used the same code with Registration form in Windows Forms Application, the screenshot is given below.
the windows forms controls used to design screen are :
Labels
Textboxes
Radio buttons
Date Time Picker
Checkbox
DropdownList
Groupbox
Listbox
Buttons
Error Provider
Timer Control
The project architecture of my windows forms application is shown in figure below
Here the Submit button click code in windows forms Application is like this :
/// <summary>
/// handles Submit Button click event
/// </summary>
/// <param
name="sender"></param>
/// <param name="e"></param>
private
void btnSubmit_Click(object
sender, EventArgs e)
{
try
{
if
(lstCities.SelectedIndex == -1 || txtUserName.Text == ""
|| txtEmail.Text == ""
|| txtPassword.Text == "" || txtCnfrmPwd.Text == "" || txtMobile.Text == ""
|| txtStreet.Text == "" || txtFilePath.Text == "" || (rbtnMale.Checked == false && rbtnFemale.Checked == false) || !isDOBValidated)
{
lblMsg.ForeColor = Color.Red;
if
(isDOBValidated == true)
{
lblMsg.Text = "All * marked fields are mandatory";
}
else
{
lblMsg.Text = "All * marked fields are mandatory. Invalid
DOB";
}
if
(lstCities.SelectedIndex == -1)
{
lblMsg.Text = "Select City";
}
return;
}
else
{
//database
insertion operation here
lblMsg.Text = "";
emp = new BEL.Employee();
emp.UserName =
txtUserName.Text;
emp.Email = txtEmail.Text;
emp.Password =
txtPassword.Text;
if
(rbtnMale.Checked == true)
{
emp.Gender = "Male";
}
else
{
emp.Gender = "Female";
}
emp.DOB =
dtpDOB.Value.ToString("dd/MM/yyyy");
emp.Mobile =
txtMobile.Text;
if
(chkPhysical.Checked == true)
{
emp.physicallyChallenged = "Yes";
}
else
{
emp.physicallyChallenged = "No";
}
emp.Country =
cmbCountry.SelectedItem.ToString();
emp.City =
lstCities.SelectedItem.ToString();
emp.Address = txtStreet.Text;
System.IO.FileInfo fi = null;
try
{
fi = new System.IO.FileInfo(txtFilePath.Text);
}
catch
(System.IO.FileNotFoundException ex)
{
//here exception may cause if filenot found
MessageBox.Show(ex.Message);
return;
}
emp.AttachedFileName =
fi.Name;
Methods = new BLL_FILES.MethodsClass();
emp.AttachedFileData =
Methods.ReadFile(txtFilePath.Text);
emp.Add();
MessageBox.Show("Registered Successfully","Registration Form",MessageBoxButtons.OK,MessageBoxIcon.Information
);
}
}
catch
(Exception ex)
{
MessageBox.Show(ex.Message);
}
}
I have designed these projects especially for beginners, and tried my best to cover all the needed controls, logic and validation part and made it more clear and useful.
I hope beginners will find this useful. For beginners, i will recommend to download the full Source code of the projects both (asp.net and winforms Application) from the links provided below.
Note: Here after downloading the source code, for windows application you need to create table in your sql server database and should change the connection string in DAL Class. The sql query to create table is also provided with the source code.
Download Asp.Net 3-tier Registration Form
Download C#.NET 3-tier Registration Form
posts you may like :


No comments:
Post a Comment
Thanks for your comments.
-Sameer